Your dog’s instinct to pull on the leash isn’t a behavior problem to be corrected; it’s an untapped source of energy waiting to be channeled. This guide shifts the focus from simply buying gear to understanding the core principles of pulling physics and dog biomechanics. By learning *why* certain equipment and training methods are crucial for safety, you can transform your dog’s natural drive into a powerful, safe, and deeply rewarding partnership in sports like canicross and bikejoring.
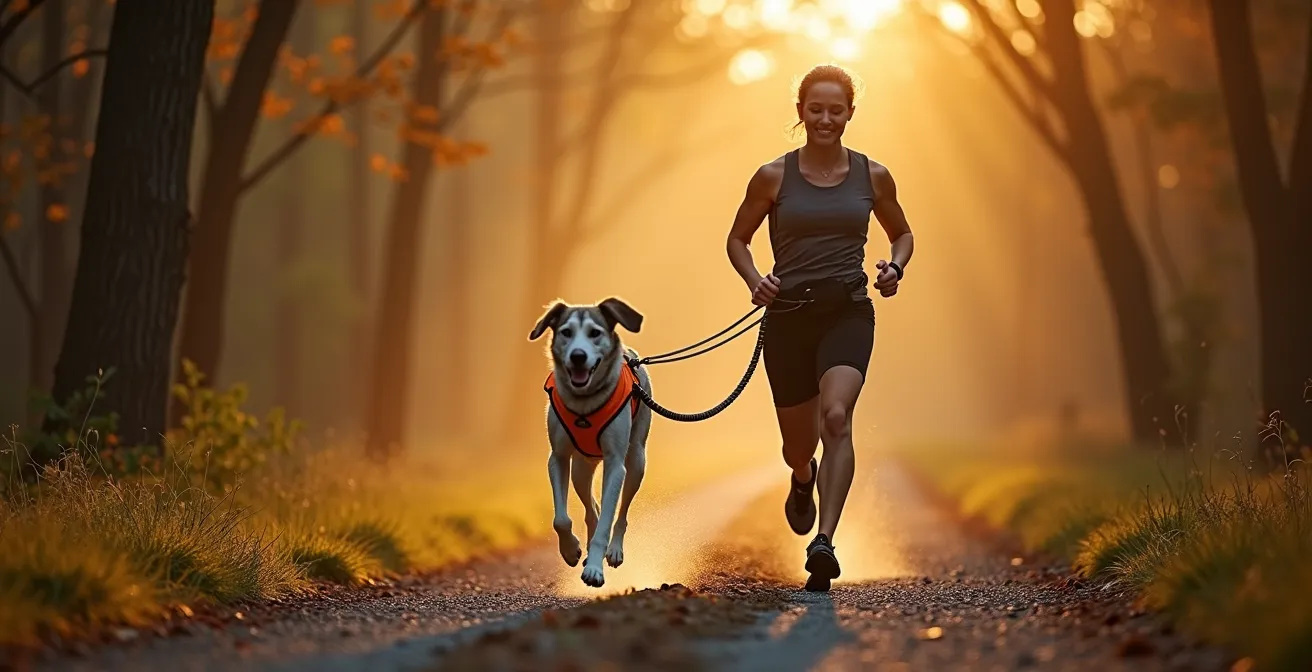
That constant tug on the leash during your walks—does it feel like a battle? For many active dog owners, a high-energy companion’s pulling instinct seems like a frustrating habit to break. Conventional wisdom offers endless advice on “loose-leash walking,” but this often misses a fundamental truth about many breeds. That drive to pull isn’t born from disobedience; it’s a deep-seated instinct, a genetic echo of ancestors bred to work in harness. What if the solution wasn’t to suppress that energy, but to give it a proper job?
This is the core philosophy of urban mushing sports like canicross (running with your dog pulling), bikejoring (biking), and skijoring (skiing). However, simply attaching a leash to a collar and running is a recipe for injury for both you and your dog. True success and safety lie in a deeper understanding that goes beyond a simple gear checklist. The key is not just knowing *what* to buy, but comprehending the physics of a pulling dog and the biomechanics that protect their body. It’s about building a complete safety system from the ground up.
Instead of just listing equipment, this guide, structured from my experience as a dryland mushing instructor, will deconstruct the “why” behind each component. We will explore how a proper harness allows for full range of motion, why shock absorption is non-negotiable, and how the right attachment point prevents catastrophic accidents. By focusing on these principles, you will learn to build a safe, efficient, and joyful partnership, truly channeling your dog’s powerful instincts.
To guide you through this journey, we will cover everything from selecting the right harness based on pulling physics to mastering the essential safety protocols for running in different conditions. This structured approach will provide the foundational knowledge needed to get started correctly.
Table of Contents: A Guide to Safe Urban Mushing
- X-Back vs. Half-Harness: Which Fit Allows Full Range of Motion?
- Musher’s Secret and Booties: Protecting Pads on Asphalt and Ice
- Gee and Haw: Teaching Left/Right Before You Strap on Skis
- The “Rule of 15°C”: When Is It Too Hot to Run Your Dog?
- Bungee Lines: Why Shock Absorption Matters for Your Back?
- Mental vs. Physical: Why a 5km Walk Isn’t Enough for a Husky?
- High Attachment vs. Low Attachment: Which Setup for Your Sport?
- Pull Point Physics: Why a Walking Harness Chokes a Pulling Dog?
X-Back vs. Half-Harness: Which Fit Allows Full Range of Motion?
The single most important piece of equipment is the harness, and not all harnesses are created equal. A walking harness, especially one with a front clip, is designed to restrict pulling. A pulling harness does the opposite: it’s designed to distribute force across the dog’s chest and body, allowing them to pull comfortably and efficiently. The goal is to find a harness that allows for complete freedom of movement, particularly in the shoulders. A harness that sits too close to the armpits or across the shoulder blades can impede a dog’s natural gait.
The two main types you’ll encounter are the X-Back, which is a classic design for constant, straight-line pulling, and the “half-harness” (like a shoulder harness), which is more versatile for sports where the pulling angle might change. The critical factor for either is the fit around the neck and shoulders. A proper fit ensures that pulling pressure is applied to the sternum (breastbone), not the soft tissue of the throat. Crucially, it must leave the shoulder blades completely uncovered. In fact, some research shows that even well-regarded Y-shaped harnesses can cause 2.6° to 4.4° less shoulder extension, hindering a dog’s natural gait. This highlights the importance of a specialized pulling design.
To ensure you have the right fit, you can perform a simple “Shoulder Freedom Test.” This hands-on check is the best way to confirm the harness won’t restrict your dog’s biomechanics during motion.
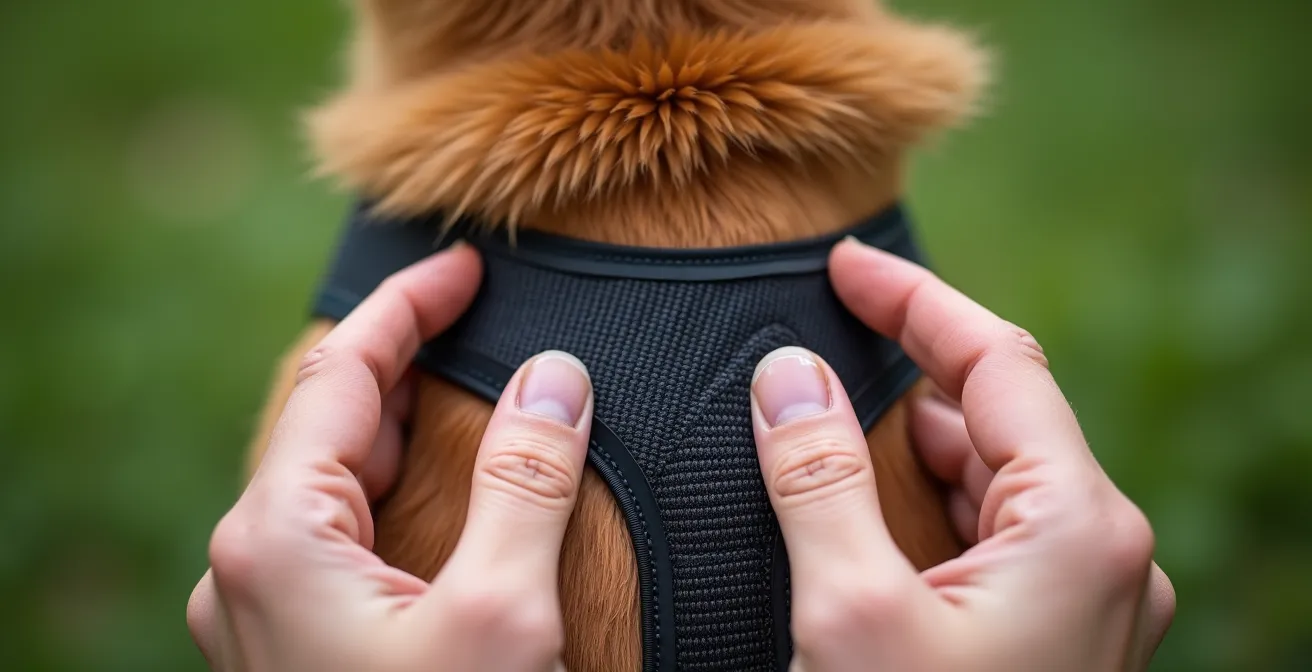
As the image demonstrates, you should physically check the gap between the harness strap and the shoulder. First, with your dog standing, place two fingers between the strap and the shoulder blade; there should be a clear gap. Next, have your dog walk forward as you keep your hand on their shoulder. The strap should not slide back or impede the shoulder’s movement. Finally, pull the harness forward from the attachment ring; the pressure should be on the sternum, not the throat or shoulders. This ensures the biomechanics of motion are fully respected.
Musher’s Secret and Booties: Protecting Pads on Asphalt and Ice
Urban mushing means running on surfaces that are far more abrasive than a forest trail. Asphalt, concrete, and salted winter sidewalks can wreak havoc on a dog’s paw pads, leading to painful abrasions, cuts, or burns. Protecting your dog’s feet is not an optional accessory; it’s a mandatory part of your safety protocol. The two primary tools for this are paw wax and dog booties, and knowing when to use each is crucial for year-round activity.
Paw wax, like the well-known Musher’s Secret, creates a semi-permeable barrier on the pads. It’s excellent for protecting against drying, minor abrasions on dirt trails, and to a limited extent, ice and salt. However, it offers almost no protection against the extreme heat of summer asphalt. Dog booties provide a physical, durable barrier between the paw and the ground. They are the only safe option for running on hot pavement or heavily salted roads. While many dogs initially resist them, positive reinforcement training can make them a non-issue.
The choice between wax and booties depends entirely on the temperature, surface, and duration of your run. For an active urban musher, having both on hand is the best strategy. The following matrix provides a clear guide for making the right decision before every outing, based on common conditions encountered in urban environments.
| Condition | Temperature | Surface | Duration | Best Choice |
|---|---|---|---|---|
| Summer Asphalt | Above 25°C/77°F | Hot pavement | Any duration | Booties (mandatory) |
| Winter Ice/Salt | Below 0°C/32°F | Salted sidewalk | Over 20 min | Booties |
| Cool Trail Run | 10-20°C/50-68°F | Dirt/gravel | Under 30 min | Paw wax |
| Rough Terrain | Any | Rocky/sharp | Over 15 min | Booties |
| Light Exercise | Moderate | Grass/soft dirt | Under 20 min | Optional/None |
Gee and Haw: Teaching Left/Right Before You Strap on Skis
Once you’re moving at speed, you can’t use leash pressure to guide your dog. You need reliable verbal steering. The traditional mushing commands are “Gee” (right) and “Haw” (left), but you can use any words you want—”left” and “right” work just as well. The key is to teach these commands in a low-distraction environment *before* you ever hook your dog up to a bike or put on your running belt. Trying to teach while also managing momentum and obstacles creates too much cognitive load for a dog that is new to the sport.
The training process should be incremental. Start on regular walks. Every time you make a turn, say the command just before you turn. Reward your dog with praise when they go the right way. This builds a simple word association. You can then progress to practicing in a hallway at home, using treats to lure them left and right while saying the command. The goal is to have the dog understand the directional cue without any physical guidance from the leash. Other essential commands to teach include “Line out” (stand ahead with the line taut, ready to go), “On by” (ignore a distraction and keep moving), and “Whoa” (stop).
A documented journey of an owner training their dog, Leo, for bikejoring highlights this process. The owner started by watching videos and decided to use “left” and “right” instead of traditional commands. They began by simply using the words on daily walks to build the association. The real breakthrough, however, came from a social learning experience. As the owner recounts, “The moment Leo saw her dogs take off in front of him, it was like a light bulb went off, and he ran after them.” This shows that learning can be accelerated by running with an experienced dog, but the foundational command work must be done first.
The “Rule of 15°C”: When Is It Too Hot to Run Your Dog?
A dog pulling in a harness is working hard, generating significantly more body heat than a dog on a casual walk. Unlike humans who sweat to cool down, dogs rely primarily on panting, which is far less efficient. This makes them highly susceptible to overheating, a life-threatening condition. As an instructor, this is the safety rule I stress the most: you must be more conservative about the heat than you think. The most widely accepted guideline is the “Rule of 15°C.”
For any intensive pulling activity, you must be extremely cautious once the ambient temperature rises. In fact, many professional mushers recommend staying below 15°C (59°F) for any serious pulling work, especially for northern breeds with thick coats. You must also consider humidity, as high humidity makes it even harder for a dog to cool down. The “back of the hand” test on the pavement is a non-negotiable pre-run check in sunny weather: if you can’t hold your hand on the asphalt for five seconds, it’s absolutely too hot for your dog’s paws, regardless of the air temperature.

Knowing the warning signs of heat stress is just as important as knowing the temperature cutoff. Early signs include a lagging pace, excessive drooling or foam at the mouth, and the dog’s gait becoming wider. If you see any of these, you must stop immediately, find shade, and provide water. Having a clear safety plan is not optional; it’s a core responsibility of the sport.
Your Heat Safety Action Plan
- Pre-Run Check: Place the back of your hand on the pavement for 5 seconds. If it’s uncomfortable for you, it’s too hot for your dog’s paws.
- Calculate Heat Index: Add the temperature in Celsius to the humidity percentage. If the total is well over 40-50, consider postponing the run.
- Watch for Early Warning Signs: Be vigilant for a lagging pace, excessive drooling or foaming, the dog veering towards shady spots, or a gait that appears wider than usual.
- Emergency Protocol: If you suspect overheating, stop immediately. Find shade, offer small amounts of cool (not ice-cold) water every few minutes, and wet the dog’s paws and belly with water.
- Recovery Rule: After any incident of heat stress, even minor, enforce a minimum of 48 hours of rest with no running to allow the body to fully recover.
Bungee Lines: Why Shock Absorption Matters for Your Back?
The line connecting you to your dog is more than just a rope; it’s a critical piece of the safety system. A standard leash or piece of static rope is dangerous for harness sports. Every time your dog lunges, changes pace, or you hit a bump, a jarring force is sent through both of your bodies. A proper mushing line incorporates a bungee section for one crucial reason: shock absorption. This elastic component smooths out the ride, protecting your dog’s back from sudden jerks and, just as importantly, protecting your own lower back from repetitive impact.
Think of it as the suspension system for your team. According to equipment research from Alpine Outfitters, professional-grade lines have a built-in bungee to “reduce the start-up shock/impact on the dog as well as the rider.” This principle of system integrity—where every component works together—is what separates safe equipment from dangerous DIY solutions. The bungee line is the link that ensures the forces of pulling are transmitted smoothly and safely between dog and human.
The right bungee line depends on your dog’s size, pull strength, and your chosen sport. A small dog doing canicross needs a softer, more forgiving bungee, while a large, powerful dog doing bikejoring requires a stiffer bungee that won’t max out its stretch immediately. The length is also important; it needs to be long enough to prevent the dog from getting tangled in your feet or bike wheels, but short enough to maintain control.
| Dog Weight | Pull Strength | Bungee Stiffness | Line Length | Best For |
|---|---|---|---|---|
| Under 40 lbs | Light | Soft (high stretch) | 6-7 ft | Canicross beginners |
| 40-60 lbs | Moderate | Medium | 7-8 ft | Canicross/light bikejor |
| 60-80 lbs | Strong | Firm | 7-8 ft | Bikejoring/scootering |
| Over 80 lbs | Very strong | Stiff (minimal stretch) | 8-9 ft | Heavy pulling/multiple dogs |
Mental vs. Physical: Why a 5km Walk Isn’t Enough for a Husky?
For a high-drive dog—whether it’s a Husky, a Border Collie, a German Shorthaired Pointer, or even a determined terrier—a simple walk around the block often fails to satisfy them. While it provides some physical exercise, it does little to engage their mind. These breeds were developed for a purpose; they have an innate need for a job. Urban mushing provides exactly that. It’s not just a physical workout; it’s a task that requires focus, responsiveness to commands, and a partnership with their human. This is the essence of energy channeling.
When a dog is pulling in harness, they are mentally engaged in a way they can’t be on a simple walk. They have to listen for cues, navigate the trail, maintain a pace, and ignore distractions. This mental stimulation is often more tiring and more fulfilling than purely physical exercise. An under-stimulated working dog is often a destructive or anxious dog. Giving them a job like canicross or bikejoring channels their mental and physical energy into a positive, structured outlet, leading to a calmer, more contented dog at home.
This principle is not limited to traditional sled dog breeds. A fantastic case study involves Muppy, an 18-pound Dachshund mix who was an impossible leash-walker. Her owner discovered that the dog’s “problem” was simply an unfulfilled desire to run and pull. After trying to keep up on foot, the owner hooked Muppy up to a bike. The result was transformative. “We were pedal to the metal!” the owner exclaimed, showcasing how the sport satisfied the tiny dog’s intense need for a job. This perfectly illustrates that the desire for a task is about temperament, not size or breed.
Key Takeaways
- A proper pulling harness is essential to allow free shoulder movement and prevent choking.
- Paw protection (wax or booties) is mandatory for running on asphalt or in extreme temperatures.
- Directional commands must be taught in a low-distraction environment before you start moving at speed.
- Never run a pulling dog in temperatures above 15°C (59°F) due to the high risk of overheating.
- A bungee line is a critical safety component that absorbs shock, protecting both your back and your dog’s.
High Attachment vs. Low Attachment: Which Setup for Your Sport?
Where you attach the bungee line to yourself or your bike is a critical safety decision that defines the pull point physics of your entire system. There are two main philosophies: high attachment (a canicross belt around your waist) and low attachment (a specialized antenna on the frame of a bike or scooter). The correct choice is determined by your sport and is not interchangeable. Using the wrong setup is one of the fastest ways to have a serious accident.
For canicross or skijoring, where you are on your own two feet, the attachment point must be a hip belt. This aligns the pulling force with your center of gravity, providing stability and allowing your core to absorb the force. The belt should be equipped with a quick-release mechanism for emergencies. For bikejoring or scootering, the attachment point MUST be low on the vehicle’s frame, specifically the head tube. This is done via a specialized “bike antenna” or “scooter noodle” that keeps the line away from the front wheel.
Attaching the line high up on a bike—to the handlebars or seat post—is exceptionally dangerous. This creates a high center of gravity, making the bike incredibly unstable. A sudden pull to the side can instantly twist the handlebars out of your hands, causing a crash. In fact, safety research indicates that handlebar attachments account for nearly 100% of bikejoring accidents involving steering loss. This is not a matter of preference; it is a fundamental rule of safety. The low attachment point on the bike’s frame ensures that the dog’s pulling force drives the bike forward without compromising your steering control.
Pull Point Physics: Why a Walking Harness Chokes a Pulling Dog?
We’ve come full circle, back to the fundamental piece of gear: the harness. Now that we understand the system, we can finally grasp the essential physics. The reason a standard walking harness is unsuitable—and often dangerous—for pulling lies entirely in its design and intended pull point. Most walking harnesses are designed with the leash attachment point on the dog’s back. This is fine for a loose-leash walk, but the moment a dog starts to pull hard, the geometry works against them. This high pull point lifts the front of the harness, causing the neck portion to tighten and press directly on the dog’s trachea, restricting breathing.
Given that UK and Irish research found that 82.7% of dogs pull on walks, it’s clear that many owners are unknowingly using equipment that works against their dog’s anatomy. A true pulling harness, by contrast, is engineered with a pull point at the very *end* of the harness, over the base of the tail. This low, rearward attachment point ensures that when the dog pulls, the force is distributed horizontally across the strong, bony structures of the chest and shoulders. The neckline remains loose and away from the throat, allowing for unrestricted breathing even under maximum exertion.
This is the most critical concept in urban mushing: a walking harness is designed to *manage* a dog on a walk, while a pulling harness is designed to *empower* a dog to perform a job safely. Using the wrong tool for the job doesn’t just reduce efficiency; it actively creates a choking hazard and restricts the very movement you are trying to encourage. Understanding this distinction is the final key to unlocking a safe and powerful partnership with your canine athlete.
By focusing on these principles of physics and biomechanics, you can confidently select the right gear, implement safe training, and transform your dog’s pulling instinct into an incredible shared adventure. The next step is to evaluate your goals and your dog’s needs to begin building your custom, safe mushing system.